Why is Mask Cleaning Important?
The Science Behind Clean Masks
Each time you use your CPAP mask, your skin leaves an oil residue around the seal. Over time, this facial oil build-up can accelerate wear and tear on the mask components and affect therapy effectiveness.
Prevents Bacteria
Daily cleaning removes bacteria and prevents infections
Extends Life
Proper care significantly extends mask lifespan
Better Comfort
Clean masks maintain seal integrity and comfort
Optimal Therapy
Maintains therapy effectiveness and air quality
Daily Cleaning Routine
Clean your mask every day or after each use
Every Day or After Each Use
Disassemble Components
Carefully separate all mask components according to your user guide. For nasal pillows masks, remove pillows from the frame.
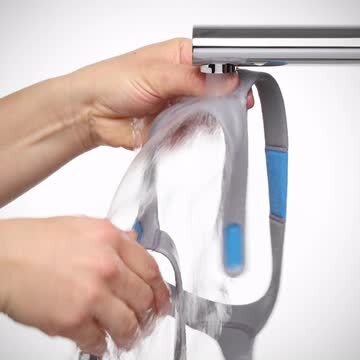
Hand Wash Components
Gently rub separated components (excluding headgear) in warm water (30°C/86°F) with mild soap.
Clean Vents & Moving Parts
Use a soft bristle brush to clean vents, swivels, and any rotating parts that require thorough cleaning.
Inspect & Repeat if Needed
Examine each component and repeat washing if not visually clean. Check for wear or damage.
Rinse Thoroughly
Rinse all components well with drinking-quality water to remove all soap residue.
Air Dry Completely
Allow all components to air dry completely out of direct sunlight before reassembly.
Weekly Deep Cleaning
Comprehensive maintenance for optimal performance
Weekly Tasks
Headgear Deep Clean
Hand wash the headgear and soft sleeves without disassembly. The dye may run during the first wash - this is normal.
Thorough Rinse
Rinse all components multiple times with clean water to ensure complete soap removal.
Complete Air Drying
Allow all components to air dry completely out of direct sunlight before storage.
Weekly Inspection
During your weekly cleaning, carefully inspect all components for signs of wear:
Replacement Schedule
When to replace mask components for optimal therapy
Component Replacement Timeline
| Component | Replacement Frequency | Signs to Replace |
|---|---|---|
|
Nasal Pillows/Cushions
|
Every 2-4 weeks | Loss of elasticity, discoloration, tears, slippery feel |
|
Headgear
|
Every 6 months | Stretched straps, frequent over-tightening needed |
|
Frame/Elbow
|
Every 6-12 months | Cracks, stiffness, broken clips or connections |
|
Complete Mask System
|
Every 12-18 months | Overall wear, reduced therapy effectiveness |
Cleaning Best Practices
Expert tips for optimal mask care
Use Natural Products
Use natural or pure cleaning solutions. Residual vapors from harsh chemicals can be inhaled if not rinsed thoroughly.
Proper Water Temperature
Use warm water (30°C/86°F) for cleaning. Too hot can damage components, too cold won't remove oils effectively.
Avoid Harsh Chemicals
Never use bleach, alcohol, or harsh detergents. These can damage mask materials and leave harmful residues.
Proper Drying
Always air dry out of direct sunlight. UV rays can degrade mask materials and affect seal integrity.
Pre-Sleep Preparation
Wash your face with pH neutral soap before bed. Avoid lotions and creams where the mask contacts your skin.
Follow User Guide
Always refer to your specific mask user guide for detailed cleaning instructions and component-specific care requirements.
Frequently Asked Questions
Common questions about mask cleaning and maintenance
While automated CPAP cleaners and wipes are available, we recommend following manufacturer guidelines for cleaning. Hand washing with mild soap and warm water remains the gold standard for most masks.
Some cleaning machines use ozone or UV light, which may not be suitable for all mask materials. Always check your mask user guide before using any automated cleaning system.
Persistent odors usually indicate incomplete cleaning or component deterioration:
- Increase cleaning frequency: Clean daily instead of every few days
- Use a soft brush: Gently scrub all surfaces, especially vents and crevices
- Soak components: Let them soak in warm soapy water for 10-15 minutes
- Check for replacement needs: Old components may retain odors permanently
If odors persist after thorough cleaning, it's time to replace the affected components.
Maintaining your cleaning routine while traveling is important for therapy success:
Pack Essentials
- Travel-size mild soap
- Small soft brush
- Clean towels
Hotel Room Cleaning
- Use bathroom sink
- Ensure good ventilation
- Allow extra drying time
Consider bringing backup components for extended trips to ensure you always have clean, functional equipment.
Avoid these products that can damage your mask or pose health risks:
Never Use
- Bleach or chlorine products
- Rubbing alcohol
- Harsh detergents
- Antibacterial soaps
- Fabric softeners
Safe to Use
- Mild dish soap
- Baby shampoo
- Gentle hand soap
- Warm water (30°C/86°F)
- Soft-bristled brushes
Need Help with CPAP Cleaning or Supplies?
Our sleep therapy experts can guide you on proper mask care, provide replacement parts, and help ensure your CPAP therapy stays effective and hygienic.